|
|
|
|
|
|
Go to | Viking Negative Plates |
Viking tech bulletins |
 Download a PDF version of this page. Download a PDF version of this page.
Technical Bulletin TRM/95
There are several variables that can cause short developer life in the
Tech Service offers the following recommendations to correct short developer life. Developer Change and Replenishment Before handling or using any chemical, be sure to read the Material Safety Data Sheet for health hazard data, precautionary information and suggested first aid. Change the developer every 30 days or 500 square feet of plate material processed per gallon of developer, whichever comes first. The Model 1133 processor holds just over 5 gallons of developer and will develop up to 2500 square feet of plate material per developer change. Use Viking™make-up solution to replenish the developer. Fill the processor using the automatic fill pump only. Do not overfill. Make sure that there is a filter in the processor when cleaning.
Gum
Gum Contamination
Filters The following filters are recommended for the Model 1133 processor: Mansville C 3.5 EP Filterite C10 A10U AMF Cuno DCCPC. When ordering one of these filters from a Graphics Arts dealer, do not accept a substitute filter. Filters in the Model 1133 processor are known to plug up at 1500 to 2000 square feet. It is suggested, therefore, that the filter be changed after 1200 to 1300 square feet of plate material has been processed.
Bearings
Rollers
Sprays
Brush Pressure If the brush has been set at a high brush pressure, it may need replacing. DO NOT PUT BRUSHES UNDER MORE PRESSURE THAN IS RECOMMENDED. The brushes will take a set at high brush pressure which ultimately will cause less pressure.
Flat Brush Pressure Adjustment
Never over-pressure the flat brushes. Too much pressure will cause the brushes to "take a set" and they usually will not recover and will have to be replaced.
NOTE: *Rotate brushes 180° every 90 days and reset pressure for maximum brush life. Setting Flat Brush Pressure Required Tools
*Hex wrench, 9/16 inches Procedure 1. Turn the POWER switch off. WARNING! DO NOT PERFORM THIS PROCEDURE WITHOUT DISCONNECTING PROCESSOR FROM MAIN POWER SOURCE UNLESS INSTRUCTED TO DO SO. IF POWER IS NOT DISCONNECTED, YOU MAY BE EXPOSED TO LIVE COMPONENTS OR MOVING PARTS. 2. Remove the top cover and developer sump cover. 3. Loosen the locking capscrews and the flat brush adjusters. 4. Tighten adjusters until the top and bottom brushes make contact with each other. 5. Turn ON the processor. If the processor is a new installation or has not been in operation for 8 hours or more, soak the flat brushes for about 15 minutes. After 7 minutes, process a plate or plates as wide as the flat brushes. If the processor has currently been in operation, soak for 2 minutes and process a plate or plates as wide as the flat brushes. 6. Turn OFF the processor with the brush ends aligned. 7. Insert test strip between the flat brushes, at the center adjuster, with the hole-punched edge toward the front of the processor, up to the nip of the second set of transport rollers. 8. Pull back on the test strip until the brush bristles are aimed outward from the processor.
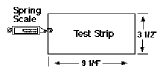
9. Attach the spring scale to the test strip.
10. Pull back on the test strip and measure the brush pressure. 11. Tighten or loosen the adjuster to obtain the following brush pressure.
S2 5 or 6 mil test strip
G1/G2 8 mil test strip
G1/G2 12 mil test strip NOTE: After the pressure of the flat brushes has been adjusted, this same pressure is used when processing plates of any caliper. 12. Repeat at all adjacent adjusters. 13. Recheck all adjusters. 14. Tighten all capscrews. NOTE: Further adjustment may be necessary if the plate does not clean out properly. (See Flat Brush Condition below.)
Flat Brush Condition 1. Take a spring scale reading, pulling the test strip toward the front of the processor, using the Setting Flat Brush Pressure procedure. 2. If necessary, adjust pressure as recommended in Step 11 of the Setting Flat Brush Pressure procedure. 3. When you get a correct readout, take a spring scale reading pulling the test strip toward the rear of the processor (use the Rear Pull Test Procedure below). Rear Pull Test Procedure
1. Remove the second set of transport
rollers: 2. Insert test strip between flat brushes from rear of processor, under center adjuster, with the hole-punched edge toward the rear of the processor. 3. Attach the spring scale to the test strip. Position the scale to 0. 4. Gently pull the test strip toward the rear of the processor. Record the spring scale reading. 5. Repeat for all adjusters. 6. The difference between the readings of the front pull and rear pull should not be more than 300 grams.
Example:
7. Replace the left guard. 8. Replace the top covers.


Copyright 1996 Imation. All rights reserved. 
|